Miss Holly tagged me. I am suppose to tell you 7 random facts about me. Gosh that could be hard. Then I am to tag others. So lets get started.
1: I love to craft, stamping, scrapping, tole painting, quilting, paper piecing to name a few. I think I have dabbled in most all of the crafts out there but these are my favorites and what I stuck with.
2: I enjoy camping with my family. We still have a tent but someday I hope to own a camper so it isn't so hard on the body. It's rough getting old!
3: I live within blocks from my parents so I can visit them whenever I want and not have to travel far. I need to do this more often.
4: I have 2 sisters and 1 brother, all live within 10 miles of me. My brother is the furthest one and one sister lives a block from my parents and one within a mile.
5: I love the holidays, I grew up in a fantasy world, the house was always decorated for the holidays. Mom really got into them and did several rooms for each one.
6: Like Holly my hubby thinks my major 3 food groups is Chocolate, Chocolate and Chocolate. The richer it is the better I like it. And yes I could live on Chocolate!
7: I love Alan Jackson, all his songs are the best. Of course his good looks and nice body helps a lot too! "wink" "wink"
Now for the rules and who I am tagging.The rules: Link to your tagger and post these 3 rules on your blog. Share 7 facts about yourself on your blog, some random, some weird. Tag 7 people at the end of your post by leaving their names as well as links to their blogs. Let them know they are tagged by leaving a comment on their blog.
Here are the girls I will be tagging:
Karen
Wanda
Dawn
Gwen
Jan
Diane
Jessica
Angel Hugs
Sunday, March 2, 2008

403 Forbidden
If any of you are getting this message. Apparently blogger had problems last night and it goofed up sending out updates to some of the blogs. Here is what you need to do to fix that problem. I will also go in and see if there is a problem on your getting your updates on my own and fix it if I can but in the meantime here is a message from www.feedblitz.com If any of you are still having problems getting updates from my blog please let me know and I will check into it.
Angel Hugs
Sunday, March 02, 2008
Blogger 403 Forbidden
Apparently last night some Blogger / Blogspot blogs returned "403 Forbidden" errors instead of the publisher's content. It's Blogger's issue, not ours, but if you were affected by this go to the Newsletter Center for your blog, switch to manual distribution and then send the posts you want via our on demand feature. Then change back to automated distribution (and let's hope that whatever ailed Blogger last night is now working again).
Angel Hugs
Sunday, March 02, 2008
Blogger 403 Forbidden
Apparently last night some Blogger / Blogspot blogs returned "403 Forbidden" errors instead of the publisher's content. It's Blogger's issue, not ours, but if you were affected by this go to the Newsletter Center for your blog, switch to manual distribution and then send the posts you want via our on demand feature. Then change back to automated distribution (and let's hope that whatever ailed Blogger last night is now working again).
Peter Cottontail Nosey Bunny

Peter is a nosey little bunny and about to fall in the Easter basket. See he has already booted out some of the eggs. Naughty little bunny. Here's hoping we all have a better bunny stopping bye our house delivering the goodies.
Also don't forget about CBC6 Chrissy's Belli challenge for the week. You have a day or two left to enter her contest. Check out Chrissy's blog here.
 Supplies needed for this project:
Summer Sun, Whisper White, Close to Cocoa, Tempting Turquoise, Pretty in Pink, Old Olive and Pink Passion. All of these are run though embossing folders for texture except for the Old Olive one.
Punches needed is small oval punch, 1 1/4 circle punch, giga punch for basket and a grass punch
Small Piece of ribbon
1/4" pompom
1/4 sheet of Summer Sun embossed with embossing folder, glue to main card.
Punch out basket in Close to Cocoa. Now from here I just winged cutting out the handle so have no pattern for this. Just got lucky I guess.
With the WW punch out 2 small ovals and one 1 1/4 circle. Cut down your feet (ovals) some as otherwise his feet is a little to big. Chalk them in with pink for the bottom of his feet.
With PIP, TT and PP cut out from small oval punch. Now these you will have to shape into eggs. I just trimmed mine until I thought they looked like eggs. I have a small egg punch somewhere but he up and left me.
Then Punch out the grass with Old Olive. I did 3 of these and it takes about 2 1/2 of them to fit across the bottom of the card.
Follow the sample shown for the basket, bunny and eggs.
Then I stamped a saying on WW and mounted this to Old Olive and onto the upper part of the card. Depending on your saying your measurements will vary so I am not adding measurements for this.
Hope you enjoyed today's project. He is a blast to watch come alive as your making him. I will be making more of them, most likely in different colors for friends and family. Use your imagination and let it flow.
Angel Hugs
Saturday, March 1, 2008
Easter Stroll
 This could of turned out better but it is good enough for now. Wanted to get one made for a so I had a sample anyway. This idea came from Susie B on SCS, such a cute idea I just had to make at least one.
Supplies needed:
Swirls cuttlebug folder
Ribbon narrow 1/8 in matching colors
Whisper White and So Saffron
Spring Gifts SU (retired)
Markers and Blender Pen
Oval Coluzzle
With the cuttlebug folder and So Saffron cs emboss card stock. Take the oval coluzzle and cut out oval. Do the same on the WW card stock with the coluzzle.
Lightly trace around the oval on the white card stock for placement of the image. Stamp image in black. Color in with markers and blender pen. With a matching marker make little dashed lines around like sample then erase the pencil marks.
Add the So Saffron to the front of the card then the ribbon on the side.
Hope you enjoyed the project.
Angel Hugs
Thursday, February 28, 2008
Hippo Better get Better
 I made this get well card for a teenager that has just finished up 2 years of cancer treatments. She now has a flu virus and ear infection from her immune system being low. I am hoping this cheers her up. Her Mom and I are on a group together for stamping. I sure hope her daughter likes this. It is also another card for Chrissy's Belli Challenge, if you haven't checked it out already check out Chrissy's blog and take the challenge. Link your card to her blog and have a chance to win a prize.
Supplies Needed:
Silver Card stock- I didn't have any gray but this turned out so shinny and cute with the silver I am glad I used it.
White and Pretty in Pink and scraps of black card stock
Mauve Mist and Basic Black Ink Pads
Sizzix Bookplates die cut also done in the silver
Two pink eyelets
1" circle punch
1/2" circle punch
1/4" circle punch
word punch
large oval punch cut two
corner rounder with tab on sides removed
Stamp main card in Mauve mist with a small background stamp. Mine has mini butterflies on it.
Stamp Pretty in Pink card stock with stamp and ink. These are cut at 2 1/8 square for behind the hippo and one is cut at 4 1/4" x 1 3/8"
Cut 2 1/4 square of silver for behind the hippo.
Cut a 1" x 4 1/4" strip of silver and use your corner rounder to make the scallops on the side. Mount this on the main card and then the larger pink piece near that leaving a little of the scalloped edge showing.
On WW stamp your word Better get Better and cut out place your bookplate over this and put in eyelets. Add glue dots and stick to card in lower right hand corner.
Make your Hippo by following the sample. Pop dot him to the pink stamped card stock piece and then to the silver and mount to the main card just off of the Pink strip.
Hope you enjoyed today's project.
Angel Hugs
Wednesday, February 27, 2008
Chrissy's Punch Belli Challenge
 Chrissy is doing another Belli Challenge and this week it is Punches. There is so many punches and so many uses for them. She made the Punchy Leprechaun for her sample to share today. I so loved making him see post here for the Leprechaun. And check out yesterday's post for more bunny punchy projects. I am also having a challenge going on that post.
So for the challenge I made my own Egg shape and made another bunny for the egg. This bunny is holding a heart in his paws. I will share the pattern for the egg I drew also, so you can make your own card.
Supplies needed:
White, Pretty in Pink, Black Card stock
 Designer Paper
Saying stamp
White Gel Pen
Black marker for making the little marking coming down for his mouth.
Black Ink Pad
Punches needed:
Large Oval and Small Oval (SU)
1" circle
1/4" circle
1 3/4" heart shaped
1/2 circle, cut in half for paws
Cut card stock at in half so you have a piece of 5 1/2 x 8 1/2 fold in half. Place egg pattern on fold slightly over the left hand side so the egg will open when cut. You can make this part about 1 1/2" long for the fold. Trace around and cut out. Add designer paper approx. the size of the 5 1/2 x 4 1/4 by gluing on, turn over and trim out. Set aside while you make the bunny.
Bunny
Punch out of white 2 large ovals, 1 - 1/2" circle and 1-1" circle for ears, head and paws
Punch out 2- small ovals and 1 - 1/4" circle in Pink for ears and nose
Punch out 2 - 1/4" circles in black for eyes
And finally punch out 1 - 1 3/4" heart in Pink
Follow sample when putting him together, put a few pop-dots on the back so he will stand out from the card.
Stamp Happy Easter in Black on White card stock and layer on Pretty in Pink. Add to card on the bottom center. Next add your pop-dotted bunny so he is centered over the top of the Happy Easter.
Thanks for stopping bye and I really hope you take on my challenge below and Chrissy's challenge today. Soon you will be already for your Easter. Remember Easter is early this year March 23rd. So get creating.
Angel Hugs
Tuesday, February 26, 2008
Easter Egg Baskets Challenge
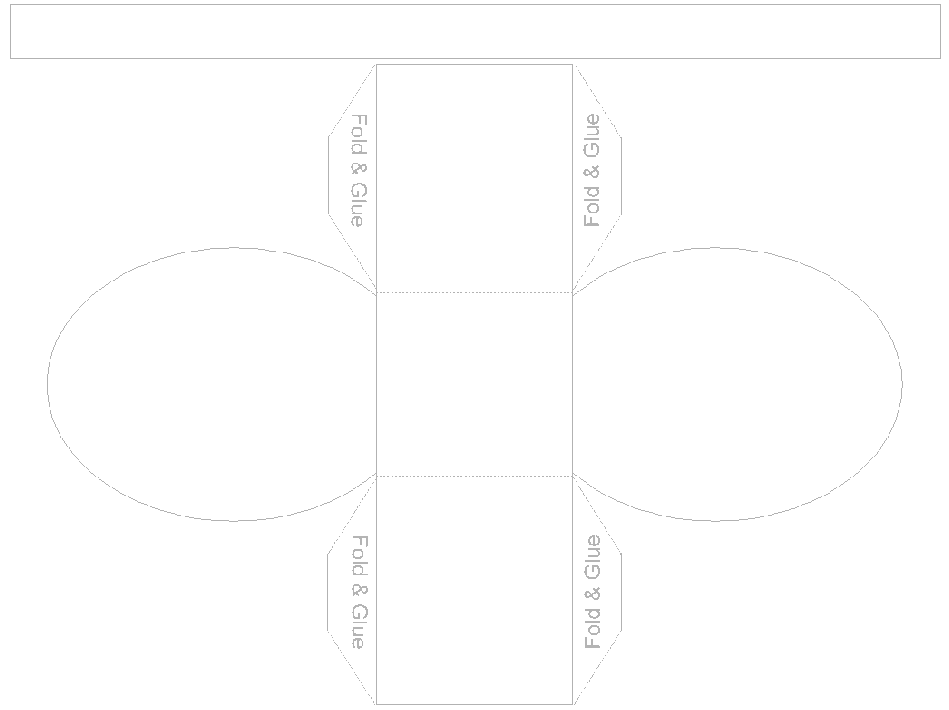
 I have a real treat for you today. I found these while searching the net looking for a basket to make for a Easter project. I found this and fell in love! What a cute and easy idea. The pattern is on the site. I will share the site in a few seconds here. But, if your wanting to get things going for Easter this is the real treat to make.
If you are demo for stamping and doing stamp camps this project is so easy and quick to to. Or if you making something cute for your table or say a place setting for guest this is really cute. I am going to challenge all my readers to make a basket and share it. You can share by posting on your own blog and linking it here or by loading to SCS and giving a link here in the comments area of this message only. When posting to SCS put in EBC1 in the keywords.
I also have another treat in store for you. I made a bunny to go on my basket made out of SU Punches. And yes you can do this he is real easy to do and turns out so darn cute. So dig out those punches and card stock and lets play.
Ok starting with the Egg Basket you will need Heavy Designer Paper or Card stock. 

Now you can't print this pattern from the website and get the correct size so download to your computer and when you print it out do it in landscape. Then you will get the correct size for making this Easter Egg Basket. With that said go to Art 4 Crafts and get the pattern downloaded and printed out. Trace and cut out your pattern. Putting the basket together is pretty self explanatory. Then I did a strip about 3/4 inch wide and about 10 inches long for the handle made out of the same print. Set aside and dig out supplies for the bunny.
Punched Bunny Supplies Needed:
1 3/4" Round Punch
1/2" circle punch
1/4" circle punch
Large and small Oval Punches
White Gel Pen to highlight eyes and nose
Card stock of color choices, I used Choc. Chip, Pretty in Pink, Black, White and craft.
Marker to make dots for Whiskers
Pop dot cut in half.
Punch out 1 3/4" out of Choc. Chip
Punch out 2 of the Large Oval in Choc. Chip for ears
Punch out 2 of the Small Oval in Pretty in Pink for ears
Punch out 2-- 1/2 circles in craft for cheeks
Punch out 2--1/4" black for eyes and one in Pretty in Pink for nose
With a tiny piece of white card stock cut two small pieces for teeth.

Follow my sample for placement. Then bend one ear down, use a small piece of pop dot for hold his ear down and give him some dimension. With marker add little dots to his cheeks for whiskers.
Add highlights with gel pen to eyes and nose. Let dry a bit so it don't smear. With pop dots add to basket. Now my ribbon refused to stay on when I put him on the basket so try some crystal effects and maybe it will stay. I need to do that to my basket yet. Or he really looks just fine without the ribbon.
Hope you enjoyed and I will be looking for all your baskets.
Angel Hugs
Monday, February 25, 2008
Blue bird Birthday
I made a really simple sketch for tomorrows challenge on the groups I am on. My drawing needs a little to be desired. But I tried anyway.

Supplies needed:
Whisper White, Night of Navy Card stock

Night of Navy Ink Pad
Stamp set of Choice.
Itty Bitty Background stamp set for background
Scalloped punch
sm. corner punch
Chalks
Cut card stock to 5 1/2 x 8 1/2 will end up being 5 1/2 x 4 1/4 when folded
Stamp with NON Ink and dotted background stamp on this. Kind of looks like the dotted Swiss material don't it?
Next with WW cut a piece that measures 2 3/4 x 5 1/2, Stamp Happy Birthday on the Right side centered. I know mine is off but I tired. With a small corner rounder take off the little case around it and start punching your scallop all the way across the bottom.
Cut NON card stock at 3 x 5 1/2, mount this to the main dotted card.
Layer the white scalloped piece on the NON.
Stamp your image on a circle to go inside your scalloped circle, with image of choice and color in.
Punch out of NON card stock the scalloped circle. Layer your stamped image on this and then onto the card.
This card is so simple to make and I think it looks pretty good for being a simple design.
Hope you enjoyed today's project.
Angel Hugs
P.S. Stay tune to tomorrow for a really neat Easter basket.
Sunday, February 24, 2008
Script Heart
 This is Julee's Sketch Challenge for the week on her blog. Check it out. She does awesome work.
I know this is the same image as yesterday but it worked so well for this sketch I think.
Supplies Needed
Pixie Pink, Glossy White, Black Card stock
Black Ink, Garden Green Ink, Pixie Pink Ink
Cuttlebug embossing folder called Swirls
Designer Paper retired from SU
Markers and Blender Pen
Pretty simple just follow the sketch.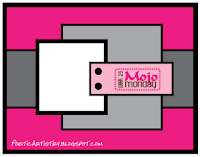

Saturday, February 23, 2008
Post it Notes!
 I got this idea from my friend Chrissy, you can see hers on her blog. I love having my post it notes handy and also decorated cute for my purse or computer stand. These make cute quick gifts when needed.
These turn out so cute and are quick and easy to make. Think I will be making more of these.
Supplies Needed:
Post it Notes

Card stock cut to 8"x 3 3/4" then layered how you wish.
Scored at 3 3/4" x 4 1/4"
Ribbon cut to the size you can make a bow with that is easy workable for you.
I used the stamp set which is retired but still beautiful Script Heart. The heart in this stamp set is so pretty and elegant.
I colored my image in with blender pens and markers. The roses are really the same color as the card stock but it isn't showing that way. Did I ever mention I don't like my scanner?
On the Burgundy Card stock I used versamark and added a smaller heart that is in the set to add tone on tone to the base of the holder.
I added my ribbon by using small zots clear adhesive dots. They are really tiny and work well with narrow ribbon.
I scribbled marker colors of choice on a piece of acetate and took my blender pen, picked up color and colored in my images. This was stamped on Glossy White Card stock. Then when it was all colored in I trimmed around the heart with my scissors and added several pop dots to the back and centered in the middle of the post it holder.
Add your post it notes to the inside, tie the ribbon in a bow and your done.
How cute and useful is that!
Angel Hugs
Subscribe to:
Posts (Atom)