He turned out so darn cute. I had to share him. He still needs a pompom for his hat but otherwise he is finished. DH will be picking them up for me after work tomorrow.
Santa was made using the coasters again. I will maybe share a few more with you this week of the coaster boxes. I am really having fun with these and my son is getting back into doing them with me. He created a bear in a night cap and a bunny one.
So lets get with making Santa!
Supplies:
5 Coasters
White Card Stock
Flesh Card Stock
Black and Red Card Stock
Swirl Cuttlebug Folder if you want to add texture to your beard and mustache.
White Gel Pen
Ribbon, you cut this by wrapping around one of your coasters 1 1/2 times, this is used to lacing him together.
Pink chalk and q-tip for shading
PomPom
Large Oval Punch
1/2 circle Punch

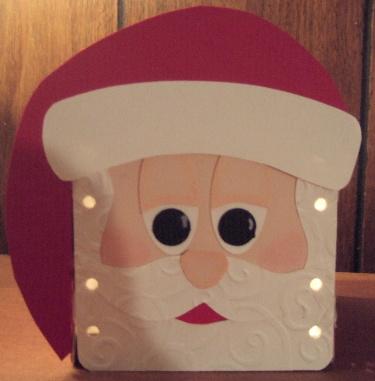
Ok with your red cs, trace around 3 coasters. I only did 3 the bottom is just plain. The 4th one you do with flesh. Glue these to the coasters. Mark your holes, and punch them out for lacing later.
For his eyes you will punch 2 white and 2 flesh colored large ovals. Punch out 2 back circles with a 1/2 inch circle punch. With Gel Pen put little marks for eyes as seen in sample. This gives your Santa a personality. Place your black circles on the lower half of the white ovals. Next with your flesh ovals you will want to cut them in half a little less than 1/2. Now with both pieces together cut them with a curve upwards like in the sample for his eyelids. Chalk around the eyelids with pink chalk and add to your eyes pieces. See sample. With one of the flesh pieces that you cut off use that for the nose. Just form him to look like a nose. Again see sample. Chalk around your nose piece to so it gives him some dimension.
Run a 1/4 sheet of white card stock through with your swirl embossing folder. With pattern trace and cut out for beard and mustache. Then cut from a piece of red his mouth. I used the lower half of the beard and placed under and traced where the mouth should be. Glue on beard then the mouth piece (red) and then mustache. Place eyes so they are even and add nose. Your face is complete.
Next you will put your box together with your white ribbon.
For the hat trace that out on your red cs and his brim of his hat on white. I used the small flat adhesive dots to put him on my Santa. The little flap on the hat is glued to the piece beside along the side. It kind of covers the ribbon. Add your brim. Add your pompom to the bottom of his hat. Put your bottom in and your done.
Now wasn't that so easy. And he turns out so cute.
Pattern for the Santa can be found here. You need to enlarge it to fit your 4" coasters. When I did mine I just put it to fit my paper when printing out. See if yours has that option.