Showing posts with label Using Coasters. Show all posts

Wednesday, August 20, 2008

Belli Challenge #30

Chris is having another Belli Challenge on her blog using coasters this week. I love working with these coasters and so do my kids. So if you want some thing your kids can get into with you on your craft this is the one. So many things you can do with coasters. As you can see mine is a note holder for this project today. I stamped some dog images, colored them in with gamsol and colored pencils and cut them out and mounted using pop dots. I added a dog to both sides of the box but left the back plain.
Supplies Needed:
Designer Paper cut 4 pieces @ 2x4
3 Coasters 4x4 cut 2 of them in half so you have 2 @ 2x4
Adhesive
Crop-a-dile
Ribbon
Crystal Effects
White Card Stock
Bow Wow Stamp set, Stamp images on White card stock in Choc. Chip Ink.
Gamsol
Colored Pencils, Color images in with gamsol and colored pencils and set aside.
Pot Dots
exacto knife
cutting mat
Directions:

Add designer paper to coasters and round off corners.
With Crop-a-dile punch 2 holes on each short side of your coasters. Do this on all 4 coaster pieces.
Measure in 1 1/2" from both sides on the top of one of the pieces. And down about and inch or so. Use exacto knife and cut out. This gives you the place so you can get at your notes easier.
Cut strips of ribbon and tie coasters together to form a box shape. With the 4x4 coaster place in bottom of box shape and use crystal effects to glue it in. Let dry for about 1/2 hour.
Put pop dots on back of dogs and attach as desired on note box. That's it pretty simple huh!
Hope you enjoyed today's project.
Check out the other projects from Chris's Design Team:
I also have other things done with Coasters on my blog you can check them out here.
Angel hugs


Saturday, December 8, 2007

Rudolph the 2nd

Last one sharing for awhile, we are still working on more but will share another time when we get them finished or as we get them finished. Whatever comes first. This is a copy of the first Reindeer I did. However I didn't much care for the first one and dd loved it so she got it. Now of course Mom had to have one for her collection of them so here he is. Same directions and pattern as before.

Here Kitty, Kitty, Kitty


Ok as I said my son was busy working on a Kitty for you all. I think he did a fine job of it. He is black so can be used for Halloween too. We had to use a white gel pen for his mouth. Hope you like him. I shared the pattern for him yesterday. Now remember Travis is 12 and he did this Kitty and the Puppy one. This one he did the pattern for all of it by himself. Pretty cool huh! So make sure and include your children on making these as you can see they do a wonderful job.
Instead of repeating each time now for the supplies just please refer to the others as they all pretty much have the same materials.
I have one more to share and will do that yet today that I made. It is another Reindeer, I like how this one turned out better than the first one.
Angel Hugs,


Friday, December 7, 2007

Pattern for Puppy Coaster Box

As promised here is the pattern for the puppy from yesterday. Sorry I didn't have it the same day as he made the puppy, we thought we made a pattern and didn't. So this one has a pattern for the puppy and he started a kitty tonight, so the kitty pattern is on it too. I will share the kitty tomorrow. He is drying right now. Now when you print out this pattern it should be the correct size for a 4 inch coaster.

Stay tune tomorrow for the kitty. Your going to love him too.

Sorry didn't get anything else done was busy destroying my kitchen. LOL doing some holiday baking. So until tomorrow, Angel hugs.

Thursday, December 6, 2007

How much is that doggy in the window...........

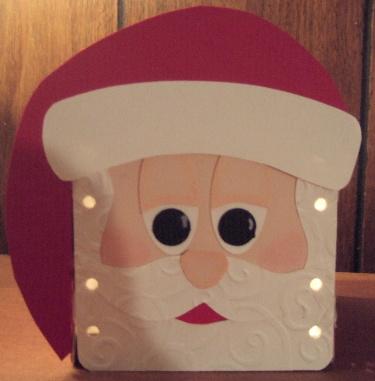
So here is the one I was telling you my youngest son made, with a little help from Mom. I made the pattern which I will share with you tomorrow as I have to do another one up we used the one I made.

Travis had this idea and a good one it is too! I love how he turned out. He is textured all around. So it looks like his fur is curly.

Travis wanted a different hat for his so I made that for him and the ears. Otherwise he did it pretty much himself, I helped put him together on the face. He run everything except the hat and brim through the sizzix machine with the swirl embossing folder. Oh and the nose and whites of eyes and blacks of eyes are not embossed either.

Isn't he just to darn cute?

Once again supplies you will need:

5 coasters

Close to Cocoa CS, trace around the coasters and make 4 for the coasters. Run them through your sizzix machine with the swirl embossing folder.

Take scraps of brown and do ears and eyelids. Again run thought sizzix with the embossing folder.

White for brim of hat an eyes

Black for eyes and nose.

Garden Green for hat

Ribbon same as the others for measurement.

White Gel Pen

Black Marker for doing mouth.


Follow directions as the others on putting him together. Do face first then add side panels lacing them one panel at a time until you have all 4 of them hooked together.

Add you ears and bow them out some so it looks more real. Add brim on his hat and mount that hat to the top of the coaster of the face. Put the bottom piece in and glue around bottom with Crystal Effects. Let dry and your done.

He was just to cute not to share. And I shared Chris's coaster of the bear so had to the dog for Travis too. Chris also made a Bunny, I can share that one to if you wish. Want to see him too?
We will see what else we can come up with and share them another time soon. Glad you are all liking these so well. We sure are enjoying making them.
Oops almost forgot add the pompom to the top of his hat.
Angel Hugs

Wednesday, December 5, 2007

Mrs. Clause

Now what would Santa be without Mrs. Clause? So I had to make her too. I sketched out some templates for her to share with you also cause I seen one done but no template. :( So now you can make on too. I do not have a pattern for the glasses however, but, can tell you how to make them. Now Mrs. Clause's honker turned out rather large. It was glued down good with flat glue dots so I couldn't make it smaller.


I did not have an easy time with the glasses so if you make one and find an easier way to do them please let me know.


Winter has hit MN and we have approx. 12 inches of snow so it has been the perfect time to work on these.


Supplies again that you will need:


5 coasters


Real Red Card stock you will need to trace around a coaster and make 3 of these. You will need to also make a hat.


Flesh is for her face, nose and eyes.


White for her hair and trim on her cap and for her eyes.


Black for eyes


1/2 inch circle punch for eyes


Large oval punch for eyes


Wire for glasses, use heavier wire mine was so thin it was hard to work with.


2 eyelets, set these so they lay flat.


1 snowflake brad


Ribbon- for this run your ribbon around a coaster 1 1/2 times and cut, you will need 4 of these.
Texture and Swirl Cuttlebug embossing folders for doing the hat and hair.


Same direction for putting together as the others.


For her glasses you will need to wrap the wire around a smaller glue tube. Leave a long wire before you do the circle around the tube so you have the wire for attaching to the holes in the lacing area. Make two of these. Then with a small piece of wire make the brace for the nose piece. Wire that to the circles on the glasses. Hope that is clear as mud.


I am doing a pattern you can down load by clicking on it or right click and save to your computer.


After everything is done add your earrings.


Really hope you are enjoying these. I have one more to share tomorrow that my youngest son made. Then I can move onto something else. These have been so much fun.

Tuesday, December 4, 2007

Polar in his nightcap


Hope your all not getting sick of these coaster boxes yet. I have a few more to share. Today I am going to share the bear my son made. He created him himself. I love his nightcap. He added stars to the nightcap. Looks so cute. The ears was a little hard to do for him for some reason. But he got some done and he turned out wonderful.


My youngest son is trying his hand at one tonight. I will share his too. DD is not into crafts at all. Youngest son Travis is making a dog. I will share his with you later this week.


So here is my son Chris's creation. Hope you like him as well as we do. Chris made his so he looks sleepy. He did add highlights to his eyes and nose later on after Mom talked him into it.


So what you need:


5 coasters


White Card Stock - trace around coasters so you have 4 and cut them out and glue to coasters.


White Large Oval for eyes, cut two


White card stock for ears. I would just do large circles for this as we had trouble coming up with a pattern for them. Next size smaller for the pink in the ears.


Black for nose and eyes. Use a 1/2" round punch for eyes. I will have a pattern for the nose or close to it.


Bashful blue for his nightcap.


Pompom white sparkly one


Black marker for mouth.


White Gel Pen


Chris also used a sizzix die with mini stars on it for the hat these are done in yellow. And glued to the nightcap.


Do the same putting him together as you did for the others (Santa, Reindeer and Snowman) they all go together the same way.


Add his face (eyes, nose and drawn on his mouth with the marker).


Once he is laced all together you will add his nightcap and ears. Ears go behind the nightcap. Add your Pompom and your done!


Now how many of you are making these cute little boxes? Please share with me if and when you make them I love to see how every one's look as each one turns out so differently. Sorry here is the pattern. Fitured more of you would want it. It is the same as the Santa hat only without the trim.


Thanks for stopping bye.


Angel Hugs


Sunday, December 2, 2007

Santa Claus is coming to town.....


He turned out so darn cute. I had to share him. He still needs a pompom for his hat but otherwise he is finished. DH will be picking them up for me after work tomorrow.


Santa was made using the coasters again. I will maybe share a few more with you this week of the coaster boxes. I am really having fun with these and my son is getting back into doing them with me. He created a bear in a night cap and a bunny one.


So lets get with making Santa!


Supplies:


5 Coasters


White Card Stock


Flesh Card Stock


Black and Red Card Stock


Swirl Cuttlebug Folder if you want to add texture to your beard and mustache.


White Gel Pen


Ribbon, you cut this by wrapping around one of your coasters 1 1/2 times, this is used to lacing him together.


Pink chalk and q-tip for shading


PomPom


Large Oval Punch


1/2 circle Punch


Ok with your red cs, trace around 3 coasters. I only did 3 the bottom is just plain. The 4th one you do with flesh. Glue these to the coasters. Mark your holes, and punch them out for lacing later.


For his eyes you will punch 2 white and 2 flesh colored large ovals. Punch out 2 back circles with a 1/2 inch circle punch. With Gel Pen put little marks for eyes as seen in sample. This gives your Santa a personality. Place your black circles on the lower half of the white ovals. Next with your flesh ovals you will want to cut them in half a little less than 1/2. Now with both pieces together cut them with a curve upwards like in the sample for his eyelids. Chalk around the eyelids with pink chalk and add to your eyes pieces. See sample. With one of the flesh pieces that you cut off use that for the nose. Just form him to look like a nose. Again see sample. Chalk around your nose piece to so it gives him some dimension.


Run a 1/4 sheet of white card stock through with your swirl embossing folder. With pattern trace and cut out for beard and mustache. Then cut from a piece of red his mouth. I used the lower half of the beard and placed under and traced where the mouth should be. Glue on beard then the mouth piece (red) and then mustache. Place eyes so they are even and add nose. Your face is complete.


Next you will put your box together with your white ribbon.


For the hat trace that out on your red cs and his brim of his hat on white. I used the small flat adhesive dots to put him on my Santa. The little flap on the hat is glued to the piece beside along the side. It kind of covers the ribbon. Add your brim. Add your pompom to the bottom of his hat. Put your bottom in and your done.


Now wasn't that so easy. And he turns out so cute.


Pattern for the Santa can be found here. You need to enlarge it to fit your 4" coasters. When I did mine I just put it to fit my paper when printing out. See if yours has that option.

Saturday, December 1, 2007

Rudolph

I am not sure if I like how this one turned out. But, my daughter loves him so she will get him. Think I will try another one another day and will share that one another time.


Here is Rudolph and his supplies needed


5 Coasters ( I painted all of them a brownish color) Next time I will just use card stock


Red, and Craft Card stock for nose and antlers


Black for eyes of card stock


Black marker for mouth


White gel pen for making marks on eye and nose


Ribbon-- I cut the ribbon 1 1/2 times the length of the coaster and used that to lace them together.


Close to Cocoa ink pad for sponging the antlers


Oval Punch Large one for eyes

Use same directions for putting him together as you did for the snowman one. This is also one of dfaust coaster boxes. She has such cute ideas.

I will try and share another one tomorrow.

Here is the pattern for the antlers. Pattern should print out to correct size. I really hope if you all make these that you share them with me. Just post a comment to my blog with a link to your creations.

Thursday, November 29, 2007

Coaster Fun! Frosty

OMG! I seen these on SCS and just had to try him. I think he turned out rather well. I am proud of this little guy. So as promised here he is a day late but he needed to dry good for my glue to stick.


You will need 5 square coasters


White 1/4 inch or so ribbon


White, Black and Orange CS


Large Oval Punch


1/2 circle punch


1/4 inch punch or your crop a dile for the mouth pieces


Corner Rounder


gray chalk for eyes


rust chalk for nose


Snowflake Brad


Red Ribbon for hat


White Acrylic Paint and foam brush


Ok to get started paint your square coasters with white acrylic paint and let dry really well. You want to be able to stick the eyes, nose, mouth and hat to this. Punch your holes along the side evenly. I used the crop a dile for this.


Next punch out with your large oval punch 2 white eyes. Chalk around them as shown in picture. With a small piece of Orange cut an angle for his carrot nose and round the end so it looks more like a carrot. I just winged this have no pattern for his nose.


With the crop a dile punch out 9 circles with the largest punch for his mouth or you can use a 1/4 punch. Crop a dile works great for this part and goes quickly. Next with your 1/2 circle punch punch out his eyes and high light with a white gel pen or marker. Put his eyes on the white oval pieces. Next put all your pieces on one of the coasters that you painted for his face.


Next you will thread your ribbon on the sides of the coasters to put the box together. With some crystal effects glue the bottom on your snowman box.


Next cut out your hat with black card stock. I did the brim about 1 1/4 wide and just a touch over the edges of the front of the coaster piece. Top part of his had is 4" x 2 1/2" high. Piece these together and add your ribbon around the upper part of the brim of his hat. With the crop a dile or a small punch, punch a hole for your snowflake brad. Attach hat to your snowman coaster. And your have created a Frosty Coaster box, now wasn't that just so simple?


I hope you all like him as much as I do. The original one to make his is on SCS here is her snowman. So my thanks for thinking of him goes to dfaust on SCS. I love him and will be trying more of your coaster creations.


My youngest son Travis now wants me to make one for his teacher at school for Christmas. So I guess I will be making more of him and maybe add a hot choc. package and some small marshmallows in a baggy. Then a candy cane to stir it. And stuff inside of Frosty.

Angel Hugs