Monday, December 31, 2007

Happy New Year


New Years @ Bopmyspace.com

Hedgehog Happiness

First of all I want to wish you all a Happy Healthy New Year. May this one be better than the last.


Today I did a sketch challenge card from Poetic Artistry. I really like this sketch and thought I would make it into a Valentine's card. So went digging through my stamps and found some ole faithful Hedgehogs. I love all my hedgies! And have kept everyone.


So here is what I did. I used the following:


Giga Scalloped Circle Punch


Med. Scalloped Circle Punch


SU Scalloped Circle Punch


Word Punch


Black Ribbon


Black Ink and White Craft Ink


Embossing folder


2 Retired Heart Eyelets


Chalks


I stamped my hedgehog image on white card stock and punched out. Colored in with chalks. One of my favorite mediums. Mounted that to the Giga Scalloped Circle.
Punched out a black scalloped Med. and then the white was done with the SU scalloped punch, I cut them in half and matched up the white and black and glued together. I punched for the heart eyelets and set them. I then took my piercing tool and pierced holes around the scalloped edges on all the black pieces.


I ran my embossing folder through my sizzix with Real Red CS, mounted that to a WW card Added black ribbon in the center. Mounted my Scalloped edge pieces and then punched out the word punch stamped in Craft White Hello...... Mounted that to the card and it is done.


So what do ya think? I thought it turned out rather well and is a big change from all my Christmas Cards and Projects.


Thanks everyone for stopping by and helping me keep my blog going. I so appreciate all the visits and messages. Looking forward to sharing more in 2008.


Until next time Have a Wonderful New Years Eve.


Angel Hugs

Sunday, December 30, 2007

Cards for our Troops

I got this off of one of the list I belong to and am hoping some of you will be able to do this and help a good cause. Remembering those fighting for our freedom and our country. They do so much for us it would be nice to do something like this in return so they can send cards to family and friends also.
If you interested contact Betty, email below.
Angel Hugs

Dear Fellow Stampers,
Now that we are looking toward the New Year and retiring stamp sets,I'd like to put out a request again for cards and card fronts. All of the cards go to our military in Iraq, Afghanistan or the wounded warriors hospital in Germany through a wonderful, all-volunteer organization, Support America's Armed Forces. You can learn more about this group that is supporting about 8000 troops on the website at:www.supportamericasarmedforces.com
We send commercial cards as well as handmade cards, but, of course,the handmade cards are the favorite. And, we send both those with notes inside to the troops and those that can be made available for them to send.
I will be hosting a work party at my home on February 9th to make new cards, to convert whatever card fronts we have by then to full cards and, especially for those who don't want to craft - to just come and write messages. This will be the first time that I have tried such an event and, being new in the community, it will be interesting to see what happens. I already have 400 cards ready to go and am setting a goal of 600 more to make 1000 for the next shipment.
There are now so many excellent groups collecting and sending cards but if you should be interested in this one, let me know and I will send you my address. If you have sent cards to me in the past, before last July, that address is no longer valid. I moved to a new community last summer to be nearer to my children.
If you live in the Seattle-Tacoma area and are interested in the work party, I'd love to have you participate!
Betty McConnellstampnsurf@comcast.net or stampingrma63@comcast.net
www.supportamericasarmedforces.com

Friday, December 28, 2007

Fun Christmas Day and Eve

Hope you all had a wonderful Christmas. Ours was very fun. Had 17 family members over so I had a house full. We had turkey, ham, mashed potatoes, gravy, buns, veggies, my sisters yummy beans, I made homemade coleslaw. We also had some goodies to go with that like some yummy pies, a dessert my sister made that was out of this world good. And of course had to have some cookies.
Christmas eve was with my dh and our kids only. We had a great time opening gifts from each other. I got some great gifts. DH and I got each other a camcorder which we used Christmas Day and love it. Takes the best video's. I got to capture my parents on video along with everyone that came Christmas Day. My oldest son got me some Pyrex mixing bowls and a waffle iron, DD got me a Pyrex cake pan an some smaller ones in a package along with some loaf pans. Mine was so yucky, I don't like the tin ones real well cause over time they rust so am loving the glass ones. My youngest son got me the Giga scalloped punch and I also got the smaller scalloped punch. So I got some really awesome gifts.
Christmas Day is the day I had everyone over. My BIL got me for Christmas and he got me the cutest Santa and a Snowman. I will get pictures and show you all what he got me. I just love them. Was so nice having everyone over. Some played games but we mostly visited and had some good laughs.
Would love to have you share with me how your Christmas turned out and what all you got. So feel free to leave a comment and share with me your Christmas.

Monday, December 24, 2007

Merry Christmas All My Blogger Friends


Just wanted to pop in quick and wish you all a Very Merry Christmas. Have a safe and healthy Christmas.

Saturday, December 22, 2007

Blog Candy Claimed & More

Kelly has come forward and claimed her blog candy from me. But, you still have a chance at some blog candy as Kelly is doing this on her blog. She has some wonderful designer paper up for grabs. Go check it out.
I have been browsing Kelly's blog and she has some wonderful things to share. Her pages are awesome. She has great cards and all, go check it out.
Kelly your blog candy will go in the mail on Monday. I missed the post office today. If they are not open I will get them in the mail no later than the 26th.
If you have a blog and would like me to see it please leave a comment to this message so I can go and visit. Leave your blog address and name.
Angel Hugs

Snow & Snowman Sayings for Pages

Snow & Snowman
SayingsCompiled & many originals by shirleyt@craftsayings.comCollection © 1972 - Present by Shirley Thomas @ CraftSayings.com

Free snow. Shovel all you want! (Put on a miniature snow shovel or a yard sign.)
Free Snowmen. Some assembly required.
Life is like a blanket of snow. Be careful how you step on it. Every step will show!
My heart belongs to old man winter.
Snowflakes are kisses sent from heaven.
A snowman is the perfect man. He's very well rounded and comes with his own broom.
Children are like snowflakes. No two are alike.
Believe in magic!
Snowman Collector. . .Please buy me!
Ready, set, snow!
Help! My suntan lotion isn't working! (with snowman beginning to drip)
I need a higher SPF!
I'm losing my head!
Snowmen keep a cool head!
I just love a good blizzard!
Cold twigs, warm heart! (Use on snowman with twig arms and painted heart.)
Cold hands, warm heart! (Can put gloves on this snowman and painted heart)
Cold nose, warm heart!
Snowmen have cold hands but warm hearts.
Snowmen have cold feet but warm hearts.
I love snowy days, frosty nights and warm hearts.
Take time to chase the snowflakes.
It takes a few extra rolls to make a good midsection.
My heart belongs to Frosty. (Put this with a snow girl.)
Home is where the snow falls.
My heart is where the snow falls.
Winter is snow much fun!
Let it Snow!
Let it snow, let it snow, let it snow. . . somewhere else!
There's no man like a snowman.
There's no buddy like a snowbuddy.
There's no people like snow people.
Snowmen are cool!
It's so hot!
How does the person who drives the snow plow get to work in the morning?
Hey funny guy, made of flakes from the sky.
Closed for the season! Reason? Freezin!
Families are forever. Love doesn’t melt. (Put with a family of snowmen.)
Made in the cold by the warmth of young hearts.
Snowballs for sale. . .going quick. . .only while supplies last!
Snowballs for sale -- our hottest seller!
Snowflakes 4 Sale!
Flakes 4 Sale! (Put with goofy snowmen)
Snow Cone Sale 5 cents!
Snowballs for sale
Flakes 5 (cents)
Snowballs 2 cents
Snow kisses 10 cents
Beware! Melting Zone!
Snowbirds welcome (Put a bird on a snowman.)
Snowed Inn Vacancy! (Put on a birdhouse.)
The great thing about snow is it makes your lawn look as good as your neighbors.
The wonder of a single snowflake outweighs the wisdom of a million meteorologists.
Flakies R Us
Snowmen are flaky.
We're all just a little bit flaky.
Some of my friends are a little flaky!
Some of my best friends are flakes.
Sleds 4 Rent
Snowmen aren't forever, but their memories are.
I grow in snow.
Snowman names: Fluffy, Flaky, Chilly, Flurry, Blitzy, Fridgy, Nippy, Snowy, Coney (with ice cream cone hat), Icy, Freezy, Frosty, Sparkles, Glitter, Glitzy, Drifter, Crystal, Twinkles, Cool Hand Luke.
Snowman Couples: Willy Melt and Betty Will, Mr. Blizzard and Mrs. Shivers, Frosty and Luvinit, Shimmer and Glimmer
Snowman's Prayer: Please freeze! Amen
Snow happens.
Snowed under.
Starlight, star bright. Protect our snowman overnight.
Starlight, star bright. Please don't let me melt tonight.
Star light, star bright, wish upon a star tonight.Let it snow and snow all night, so school's let out by morning light.
There’s snow place like home.
In the meadow, we can build a snowman.
I believe in snow angels. (Put wings on a snowman.)
Snow Thyme! (Snowman with herbs)
A snowman is love and laughter all rolled up into one.
Don't worry I'll come back some day.
Wanted: Magic hat.
Where is my magic hat?
Our kids are a chip off the old ice block!
You do the cooking. I can't go near the stove. (On a snowman with apron or on a snowman with fork and spoon)
It takes the young at heart to make a snowman from a bunch of snowflakes.
There's no business like snow business.
I left my heart in Alaska.
Snowmen melt because they have no water retention.
Snowmen fall from heaven unassembled.
Welcome snow!
Hail to the snowmen!
Snowmen melt my heart.
Snowmen are a bunch of flakes!
Snowflakes are some of nature's most fragile things, but just look what happens when they stick together.
Got snow?
I'd melt for you.
I melt over you.
Snow is my life.
North Pole or melt!
North Pole or bust!
Sunshine melts snowmen's hearts.
Snowmen fall from heaven one flake at a time.
Will work for snow.
Will work for freezer space.
Hug your snowman. It's cold out there!
Hug a snowman. It's a cold world out there.
I wish shoveling snow was like scooping ice cream: Your choice, one scoop or two.
Snowbuddy loves you as much as me.
A carrot and some coal, to make a winter friend add snow.
Accessorize! Accessorize! Accessorize!
Whenever a snowman melts awayA snow angel is added to heaven that day.
It's embarrassing when you can't look down and see your feet.
Flurries forever.
It's snow time!
Think snow!
Winter is the best of the four seasons.
Be a jolly, happy soul!
You know you've made it when they write a song about you.
Don't get too much sun!
Hold your ground, even when the heat is on.
It's fun to hang out in your front yard
It's okay if you're a little bottom heavy.
Snow guards for hire!
There's no stopping you once you're on a roll.
There's nothing better that a foul weather friend.
Wearing white is always appropriate
We're all made up of mostly water.
Where does the white go when the snow melts?
Snowfolk Welcome
Did I hear someone say snow?
God bless snowmen.
I'm dreaming of a white winter!
Snow Ice Cream 1/2 c heavy cream, 4T sugar, 1t vanillaWhip cream. Mix in sugar & vanilla. Place snow in a large bowl and add cream mixture. If desired drizzle with chocolate syrup.
May all your days be happy and brightAnd may all your Christmases be white.
Frosty, in this blizzard I can't go out today.Won't you come inside with me and play?
To make a winter friendFind a carrot and some coal.Gather up your friendsAnd roll a bunch of snow!
I made a snowman round and fat,And on his head I put a hat,He sat out in the sun all day,And slowly melted all away,But I can tell just where he sat,Because he didn't take his hat.
The snow is always whiter on the other side of the snow fence.
Snow angels bless the winter.
Old snowmen never die, they just melt away.
I used to be snow white, but I drifted.
There's nothing like warm hearts on a snowy day.
Like snowflakes, no two angels are alike.
Snowflakes are beautiful, pure and whiteand like God's children, no two are alike.
Sleigh Parking Only -- Others will be snowballed.
Sleigh Parking Only -- Others will be snowed.
A snowy winter brings a plentiful harvest.
Cleaning your house while your kids are still growing is like shoveling the walk while it's still snowing
What do you get when you cross a snowman with a vampire? A: Frostbite!
Melting Contest (picture with snowmen) Add comments like: Last year's winner never returns. Oh no, I don’t want to win. I'm losing my head! I'll be back! Love doesn't melt.
Snowmen Headquarters, Ice Skate Rental, Ski Lift, Lodge (Put with directional pointing signs on a post. Paint a snowman on it.)
Season of white, cold the nightStars shine bright, all is right.
Let it snow, let it snow, let it snow!!!
Snowflakes wanted!

Winter Brew

Here is a little poem to go with a cup of Hot Chocolate.

Warm Winter Brew© 2001 by Shirley Thomas@ CraftSayings.com

Brrrrr! It's cold out today.
Inside I think we should stay.
So I'd like to share with you my special warm winter brew.
I filled it with the whistling of birds,
a bit of spring too pretty for words,
the sweetest scent of the first flowers and the freshness of spring showers.
I packed it full of laughter so fine,
laced with lots of dazzling sunshine,
that I picked on a summer dayalong with some fun and play.
I put in the sound of leaves rustling
and flying in the air all bustling.
And I put in just a little nip of windto give it a bit of a kick, my friend.
So sip and think of days to come.
They'll be filled with lots of fun...
Getting together with friends too,
and like this, warming thru and thru!

Friday, December 21, 2007

Blog Candy Winner

First of all I want to tell you that I have read and enjoyed all of your Christmas Traditions. You all have great traditions.
It is hard to pick just one and this one don't happen anymore but it was my favorite tradition of all. I used to go shopping every year with my Dad. We would go and buy my Mom her Christmas gifts from Dad. I so miss doing that but they have gotten up there in age and no longer have the health to go out and shop like we used too. Dad and I always had so much fun, we would go for breakfast and then take off and go shopping. We always hit the shops that had those fancy, sexy nighties! Each year Mom would get a new nightie and a robe. Sometimes he would add slippers to that but she always got at least one nightie. We used to laugh cause one of the stores we would go to it was a man that did the sexy nighties. He would hold them up to himself and model them for us. LOL I really miss those times with my Dad and it will be a memory I will cherish forever.
So without further ado...........................
Drum roll please..............................


The winner of the blog candy is:
Kelly's Artistic Journaling said...

So cute! Family tradition. Christmas Eve we all get a brand new pair of jammies, play a new family board game and sleep in the same room.

So Kelly if you can get a hold of me with your address I can send these goodies out to you. I will give you 24 hours to contact me or I will have my son draw another name and we will go from there. Congrats Kelly, hope to hear from you soon.
Angel Hugs

Reindeer Games


Here is a sample of the reindeer all done up. I hope you like him. I got some new Purely Pomegranate Card Stock and love it. I also got the matching satin ribbon.

The main card is Purely Pomegranate cs stamped layered on WW, with the flannel background in white. Love how that turned out.


I stamped the image of the reindeer in Choc Chip and colored him in with chalks. I used the biggest 1 3/4 inch square punch for him. I then layered him on some PP and then again on WW.

I stamped snowflakes on a strip of PP mounted this to WW and attached to the front of the card. Added a layer of ribbon over that and then mounted the Reindeer onto the card.

I think he turned out rather well.

Monday, December 17, 2007

Blog Candy

How about some blog candy? I was out shopping for Christmas this weekend and ran into this adorable acrylic stamp set and thought what a great blog candy this would make. And yes I did pick one up for myself too. I love the little reindeer. I am reaching the magic 5000 mark and wanted to offer up some blog candy. So this is what you have to do. Tell me what your favorite family tradition is. I will put everyone in a box and have my son draw a name out. If your the lucky winner I will give you 24 hours to get in touch with me with your full name and address. If no one contacts me in that time I will do another draw.
You have until Thursday to share your traditions with us. I will let you know Friday who the winner is. So lets start hearing those family traditions. I will only accept one post per person and it has to be on this message.

Friday, December 14, 2007

Snow Mail for Gina


This card is going to Gina, remember I sent you to Courtney's Blog for the candy? Well this is the card that I am sending. I hope she and the kids enjoy the card. I sent a special message in it for her.

Now this is a NON SU card. I got this stamp of the snowman from a friend and I thought it was so cute.
Special prayers go out to Gina.
Angel Hugs

Thursday, December 13, 2007

Hedgehog Snowman

I didn't drop off the face of the earth, but have been nursing my back. I put it out this week and haven't been able to sit for long periods of time so my blog has suffered. Thanks for still sticking with me.

I made a couple of cards before my back went out and I will start to share them with you until I am able to create again.

This was a sketch challenge I did about a week ago for my groups. I enjoyed making this one it was fun to dig through old stamps and come up with something different.

Supplies needed:
Bashful Blue, Basic Black, Whisper White CS
White Craft Ink, Black Ink
Oval Scalloped punch
Crop-a-dile
Chalks
Black Eyelets

Directions:

I used Bashful Blue as my main card.

Then cut 2 pieces that are 1 3/4 x 4. I stamped all three pieces using snowflakes. 2 different sized and styled ones with Craft white ink. Then I layered the 1 3/4 x 4 inch pieces on black and cut around them so it has about an 1/8 on all sides. Then I cut out little tabs for the sides. They are approx. 3/4 x 1 1/4 so you have enough to go under the panels. With the cropadile I punched holes for brads. Added my brads and glued them to my panels. Now glue your panels to your card. With an oval or round scalloped punch stamp your image. In my case I used the Hedgehogs. Still love this set. Then colored them in and mounted them with dimensional dots. Super easy.

Christmas Hedgehogs is a retired set from SU. But, it was one of my favorites so he is still in my collection along with many other SU hedgehogs.

My image was chalked in and then burnished. So what you do to do this is turn your piece over after you are done chalking it on a white sheet of paper and rub so the chalk goes into the card stock real well. Less chance of smearing then.

Angel Hugs

Monday, December 10, 2007

Blog Candy from Courtney

Hi everyone I have a surprise for you to check out. I was on Courtney's Blog and she is doing a great blog candy so I wanted to share with you. Make sure and check out the rest of Courtney's blog, she does wonderful work. I think this is wonderful what she is doing for her friend Gina. I for one am going to be doing this. And I hope you join me in doing this for Gina too. What better way to cheer someone up than to receive a nice card in the mail.


15K Hits Blog Candy for a great cause!
This 15K Blog Candy is for a 1 year subscription of your choice to EITHER Paper Crafts magazine OR Family Fun magazine. This IS open to everyone, even internationally. In fact, I encourage international stampers to help out!!
If you already have a subscription to either magazine, this will be added to your current subscription!
One of my stamping customers is very ill. Her name is Gina and she is a young mother of three young boys. She has started chemotherapy treatments. She is having a hard time being a mom and wife while being so sick. She really needs some encouragement!! You all did so wonderfully showering Victoria with hundreds of cards. In this season of giving and thankfulness, can we show the same kind of love and support for Gina? Here's what to do to be entered in the drawing:
1. Send a card to Gina. It does NOT have to be hand stamped!

Gina Landry

9916 Longleaf

Orange, TX 776322.

Send me a picture of the card or a link to the site you have a picture posted on.
That's it!You will get one entry for sending me a picture of your card.
You will get two entries if it is a hand made card.
You will get three entries if you link this to your blog or website to help get the word out!
I will close this blog candy out on Friday, December 21. I will have my children pick a name on Saturday, December 22nd. Let's see how many different states and countries we can get involved!
**Remember you need to post a photo or link of your card to Gina on Courtney's Blog to be entered in the drawing.** Not my blog on this one.
Lets all send some cheer to Gina.

Once again visit Courtney's Blog to get in on the great blog candy.
Angel Hugs

Saturday, December 8, 2007

Rudolph the 2nd

Last one sharing for awhile, we are still working on more but will share another time when we get them finished or as we get them finished. Whatever comes first. This is a copy of the first Reindeer I did. However I didn't much care for the first one and dd loved it so she got it. Now of course Mom had to have one for her collection of them so here he is. Same directions and pattern as before.

Here Kitty, Kitty, Kitty


Ok as I said my son was busy working on a Kitty for you all. I think he did a fine job of it. He is black so can be used for Halloween too. We had to use a white gel pen for his mouth. Hope you like him. I shared the pattern for him yesterday. Now remember Travis is 12 and he did this Kitty and the Puppy one. This one he did the pattern for all of it by himself. Pretty cool huh! So make sure and include your children on making these as you can see they do a wonderful job.
Instead of repeating each time now for the supplies just please refer to the others as they all pretty much have the same materials.
I have one more to share and will do that yet today that I made. It is another Reindeer, I like how this one turned out better than the first one.
Angel Hugs,


Friday, December 7, 2007

Pattern for Puppy Coaster Box

As promised here is the pattern for the puppy from yesterday. Sorry I didn't have it the same day as he made the puppy, we thought we made a pattern and didn't. So this one has a pattern for the puppy and he started a kitty tonight, so the kitty pattern is on it too. I will share the kitty tomorrow. He is drying right now. Now when you print out this pattern it should be the correct size for a 4 inch coaster.

Stay tune tomorrow for the kitty. Your going to love him too.

Sorry didn't get anything else done was busy destroying my kitchen. LOL doing some holiday baking. So until tomorrow, Angel hugs.

Thursday, December 6, 2007

How much is that doggy in the window...........

So here is the one I was telling you my youngest son made, with a little help from Mom. I made the pattern which I will share with you tomorrow as I have to do another one up we used the one I made.

Travis had this idea and a good one it is too! I love how he turned out. He is textured all around. So it looks like his fur is curly.

Travis wanted a different hat for his so I made that for him and the ears. Otherwise he did it pretty much himself, I helped put him together on the face. He run everything except the hat and brim through the sizzix machine with the swirl embossing folder. Oh and the nose and whites of eyes and blacks of eyes are not embossed either.

Isn't he just to darn cute?

Once again supplies you will need:

5 coasters

Close to Cocoa CS, trace around the coasters and make 4 for the coasters. Run them through your sizzix machine with the swirl embossing folder.

Take scraps of brown and do ears and eyelids. Again run thought sizzix with the embossing folder.

White for brim of hat an eyes

Black for eyes and nose.

Garden Green for hat

Ribbon same as the others for measurement.

White Gel Pen

Black Marker for doing mouth.


Follow directions as the others on putting him together. Do face first then add side panels lacing them one panel at a time until you have all 4 of them hooked together.

Add you ears and bow them out some so it looks more real. Add brim on his hat and mount that hat to the top of the coaster of the face. Put the bottom piece in and glue around bottom with Crystal Effects. Let dry and your done.

He was just to cute not to share. And I shared Chris's coaster of the bear so had to the dog for Travis too. Chris also made a Bunny, I can share that one to if you wish. Want to see him too?
We will see what else we can come up with and share them another time soon. Glad you are all liking these so well. We sure are enjoying making them.
Oops almost forgot add the pompom to the top of his hat.
Angel Hugs

Wednesday, December 5, 2007
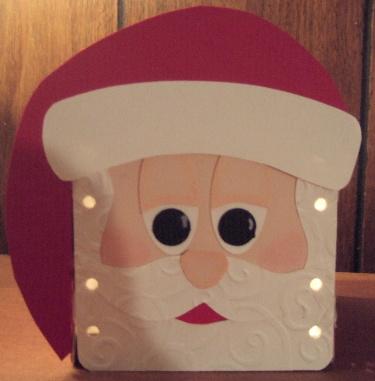
Mrs. Clause

Now what would Santa be without Mrs. Clause? So I had to make her too. I sketched out some templates for her to share with you also cause I seen one done but no template. :( So now you can make on too. I do not have a pattern for the glasses however, but, can tell you how to make them. Now Mrs. Clause's honker turned out rather large. It was glued down good with flat glue dots so I couldn't make it smaller.


I did not have an easy time with the glasses so if you make one and find an easier way to do them please let me know.


Winter has hit MN and we have approx. 12 inches of snow so it has been the perfect time to work on these.


Supplies again that you will need:


5 coasters


Real Red Card stock you will need to trace around a coaster and make 3 of these. You will need to also make a hat.


Flesh is for her face, nose and eyes.


White for her hair and trim on her cap and for her eyes.


Black for eyes


1/2 inch circle punch for eyes


Large oval punch for eyes


Wire for glasses, use heavier wire mine was so thin it was hard to work with.


2 eyelets, set these so they lay flat.


1 snowflake brad


Ribbon- for this run your ribbon around a coaster 1 1/2 times and cut, you will need 4 of these.
Texture and Swirl Cuttlebug embossing folders for doing the hat and hair.


Same direction for putting together as the others.


For her glasses you will need to wrap the wire around a smaller glue tube. Leave a long wire before you do the circle around the tube so you have the wire for attaching to the holes in the lacing area. Make two of these. Then with a small piece of wire make the brace for the nose piece. Wire that to the circles on the glasses. Hope that is clear as mud.


I am doing a pattern you can down load by clicking on it or right click and save to your computer.


After everything is done add your earrings.


Really hope you are enjoying these. I have one more to share tomorrow that my youngest son made. Then I can move onto something else. These have been so much fun.

Tuesday, December 4, 2007

Our Mission: Remember - Honor - and Teach

This is so touching and I think we all need to remember those who fought for our rights to be a free country. We need to thank our Veterans when we see them and remember what they have doing for us and those fighting now for what they are doing to protect and make our freedom known.
So here is my Thank You to those Veterans and those fighting for us now. May you all have a safe and happy Christmas. I pray for you to arrive safely back home again to your family. And for those that served Thank You all and Merry Christmas!
Check this out and please watch the video's.
http://www.wreathsacrossamerica.org/
Angel Hugs

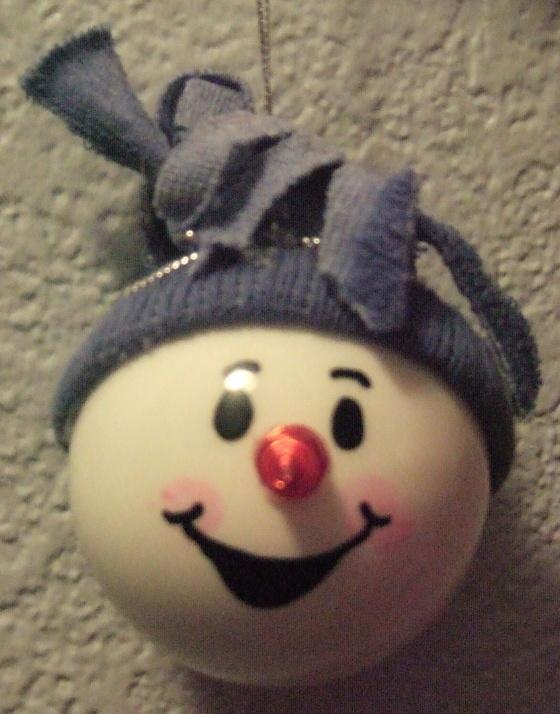
Polar in his nightcap


Hope your all not getting sick of these coaster boxes yet. I have a few more to share. Today I am going to share the bear my son made. He created him himself. I love his nightcap. He added stars to the nightcap. Looks so cute. The ears was a little hard to do for him for some reason. But he got some done and he turned out wonderful.


My youngest son is trying his hand at one tonight. I will share his too. DD is not into crafts at all. Youngest son Travis is making a dog. I will share his with you later this week.


So here is my son Chris's creation. Hope you like him as well as we do. Chris made his so he looks sleepy. He did add highlights to his eyes and nose later on after Mom talked him into it.


So what you need:


5 coasters


White Card Stock - trace around coasters so you have 4 and cut them out and glue to coasters.


White Large Oval for eyes, cut two


White card stock for ears. I would just do large circles for this as we had trouble coming up with a pattern for them. Next size smaller for the pink in the ears.


Black for nose and eyes. Use a 1/2" round punch for eyes. I will have a pattern for the nose or close to it.


Bashful blue for his nightcap.


Pompom white sparkly one


Black marker for mouth.


White Gel Pen


Chris also used a sizzix die with mini stars on it for the hat these are done in yellow. And glued to the nightcap.


Do the same putting him together as you did for the others (Santa, Reindeer and Snowman) they all go together the same way.


Add his face (eyes, nose and drawn on his mouth with the marker).


Once he is laced all together you will add his nightcap and ears. Ears go behind the nightcap. Add your Pompom and your done!


Now how many of you are making these cute little boxes? Please share with me if and when you make them I love to see how every one's look as each one turns out so differently. Sorry here is the pattern. Fitured more of you would want it. It is the same as the Santa hat only without the trim.


Thanks for stopping bye.


Angel Hugs


Monday, December 3, 2007

Look what I got in an ornament exchange....


I so love this little guy. Isn't he just the cutest? Tracy made him and sent him to me. On one of my yahoogroups we did a ornament exchange that lasted all year. I think January is the end of it. I made 19 ornaments and sent them out. Well 18 I have one left to send. Sorry Bev, but it is coming. I made an extra ornament for a friend the ornaments I sent was the snowflakes and the pine cones. You can see them else where in my blog.
I have to find some white bulbs for making these and make some for next year. I am sure I can find the bulbs after Christmas and much cheaper.
Hope you enjoy him.
Angel Hugs

Sunday, December 2, 2007

Santa Claus is coming to town.....


He turned out so darn cute. I had to share him. He still needs a pompom for his hat but otherwise he is finished. DH will be picking them up for me after work tomorrow.


Santa was made using the coasters again. I will maybe share a few more with you this week of the coaster boxes. I am really having fun with these and my son is getting back into doing them with me. He created a bear in a night cap and a bunny one.


So lets get with making Santa!


Supplies:


5 Coasters


White Card Stock


Flesh Card Stock


Black and Red Card Stock


Swirl Cuttlebug Folder if you want to add texture to your beard and mustache.


White Gel Pen


Ribbon, you cut this by wrapping around one of your coasters 1 1/2 times, this is used to lacing him together.


Pink chalk and q-tip for shading


PomPom


Large Oval Punch


1/2 circle Punch


Ok with your red cs, trace around 3 coasters. I only did 3 the bottom is just plain. The 4th one you do with flesh. Glue these to the coasters. Mark your holes, and punch them out for lacing later.


For his eyes you will punch 2 white and 2 flesh colored large ovals. Punch out 2 back circles with a 1/2 inch circle punch. With Gel Pen put little marks for eyes as seen in sample. This gives your Santa a personality. Place your black circles on the lower half of the white ovals. Next with your flesh ovals you will want to cut them in half a little less than 1/2. Now with both pieces together cut them with a curve upwards like in the sample for his eyelids. Chalk around the eyelids with pink chalk and add to your eyes pieces. See sample. With one of the flesh pieces that you cut off use that for the nose. Just form him to look like a nose. Again see sample. Chalk around your nose piece to so it gives him some dimension.


Run a 1/4 sheet of white card stock through with your swirl embossing folder. With pattern trace and cut out for beard and mustache. Then cut from a piece of red his mouth. I used the lower half of the beard and placed under and traced where the mouth should be. Glue on beard then the mouth piece (red) and then mustache. Place eyes so they are even and add nose. Your face is complete.


Next you will put your box together with your white ribbon.


For the hat trace that out on your red cs and his brim of his hat on white. I used the small flat adhesive dots to put him on my Santa. The little flap on the hat is glued to the piece beside along the side. It kind of covers the ribbon. Add your brim. Add your pompom to the bottom of his hat. Put your bottom in and your done.


Now wasn't that so easy. And he turns out so cute.


Pattern for the Santa can be found here. You need to enlarge it to fit your 4" coasters. When I did mine I just put it to fit my paper when printing out. See if yours has that option.

Saturday, December 1, 2007

Rudolph

I am not sure if I like how this one turned out. But, my daughter loves him so she will get him. Think I will try another one another day and will share that one another time.


Here is Rudolph and his supplies needed


5 Coasters ( I painted all of them a brownish color) Next time I will just use card stock


Red, and Craft Card stock for nose and antlers


Black for eyes of card stock


Black marker for mouth


White gel pen for making marks on eye and nose


Ribbon-- I cut the ribbon 1 1/2 times the length of the coaster and used that to lace them together.


Close to Cocoa ink pad for sponging the antlers


Oval Punch Large one for eyes

Use same directions for putting him together as you did for the snowman one. This is also one of dfaust coaster boxes. She has such cute ideas.

I will try and share another one tomorrow.

Here is the pattern for the antlers. Pattern should print out to correct size. I really hope if you all make these that you share them with me. Just post a comment to my blog with a link to your creations.

Thursday, November 29, 2007

Coaster Fun! Frosty

OMG! I seen these on SCS and just had to try him. I think he turned out rather well. I am proud of this little guy. So as promised here he is a day late but he needed to dry good for my glue to stick.


You will need 5 square coasters


White 1/4 inch or so ribbon


White, Black and Orange CS


Large Oval Punch


1/2 circle punch


1/4 inch punch or your crop a dile for the mouth pieces


Corner Rounder


gray chalk for eyes


rust chalk for nose


Snowflake Brad


Red Ribbon for hat


White Acrylic Paint and foam brush


Ok to get started paint your square coasters with white acrylic paint and let dry really well. You want to be able to stick the eyes, nose, mouth and hat to this. Punch your holes along the side evenly. I used the crop a dile for this.


Next punch out with your large oval punch 2 white eyes. Chalk around them as shown in picture. With a small piece of Orange cut an angle for his carrot nose and round the end so it looks more like a carrot. I just winged this have no pattern for his nose.


With the crop a dile punch out 9 circles with the largest punch for his mouth or you can use a 1/4 punch. Crop a dile works great for this part and goes quickly. Next with your 1/2 circle punch punch out his eyes and high light with a white gel pen or marker. Put his eyes on the white oval pieces. Next put all your pieces on one of the coasters that you painted for his face.


Next you will thread your ribbon on the sides of the coasters to put the box together. With some crystal effects glue the bottom on your snowman box.


Next cut out your hat with black card stock. I did the brim about 1 1/4 wide and just a touch over the edges of the front of the coaster piece. Top part of his had is 4" x 2 1/2" high. Piece these together and add your ribbon around the upper part of the brim of his hat. With the crop a dile or a small punch, punch a hole for your snowflake brad. Attach hat to your snowman coaster. And your have created a Frosty Coaster box, now wasn't that just so simple?


I hope you all like him as much as I do. The original one to make his is on SCS here is her snowman. So my thanks for thinking of him goes to dfaust on SCS. I love him and will be trying more of your coaster creations.


My youngest son Travis now wants me to make one for his teacher at school for Christmas. So I guess I will be making more of him and maybe add a hot choc. package and some small marshmallows in a baggy. Then a candy cane to stir it. And stuff inside of Frosty.

Angel Hugs

Tuesday, November 27, 2007

Such a busy day..........

Working on some coasters and they are not dry yet so I will share tomorrow. I have been working on them this evening. But so far they are not drying to well.
I didn't get to get anything else done as I was on the phone fighting with the title company on our home and land. They gave it away back to the guy that we bought it from so we are fighting to get that back and it took up all my time today plus! Was ordering gas today for heat for the house. And of course then you have all these phone calls in between. Kids homework and so on.
So look tomorrow for something fun to do.
Angel Hugs

Monday, November 26, 2007

Sparkly Frosty

Check out Frosty he is all in his glory! With all the metallic sparkles around him. I bought some foil Christmas wrap and run it through my sizzix with the snowflake embossing folder. And also did the same with some sparkly card stock I found at the dollar store one time. That is the silver background.


I stamped Frosty on Glossy card stock and colored him in with SU Markers. Cut him out and mounted him to the bluish foil. Trimmed the foil down so it is around a 1/4 inch all around him and mounted that to Real Red and trimmed. Did the same with the foil on the bottom I mounted it on Real Red card stock and trimmed 1/4 inch on each side. Mounted both pieces to the silver and onto Real Red card stock base. Then stamped Happy Holidays with black on Glossy card stock and mounted to Read Red and trimmed to 1/4 inch. Mounted this in the lower corner of the card.


It is a bit sparkly not sure what I think of it but this is the challenge card for the groups on Tuesday this week.

Here is the sketch for the challenge in case you would like to give it a shot. Again I got this sketch from Maria, I think her sketches are so fun to do.


The card itself will be going to my two cousins one is blind and can feel the embossing and the outlining of Frosty. And the other loves sparkles. They live together and my aunt is gone and my uncle is in the nursing home. So I hope they like their card.


Angel Hugs

Sunday, November 25, 2007

Life Little Pleasures

Sorry everyone I have been so caught up in life's little pleasures that I have neglected my blog. After Thanksgiving which was at my sisters house we got home late. Went to bed and was up at 3:30 am out the door by 4 and on our way to black Friday shopping. Wow, what a crowd but some great deals. I got a lot of Christmas shopping done. We hit several places, Walmart being first as my kids wanted several things to buy themselves also. So Walmart we separated and each stood by what we wanted and got them before they was all gone. This year they had it set up different here so it was so much easier to get to the things. Next we headed over to Fleet Farm as my son wanted a car jack set. Wow was that thing awesome and heavy. But, we ended up getting that, was surprised they had so many left. Then off to Target, dd wanted a game there and we also found some great movies we had been looking for and a price who could refuse. 3.88 each for some of them and 5.88 for the others. My kids of course loaded up on that one. They are also buying for friends so they got some good deals there. Off to Sears for a tool for my brother and then to McD. for breakfast and home. Took a long nap as I hadn't slept the night before.

Yesterday Dad was sick so I took Mom for her weekly hair appointment and then took her to do her Christmas shopping. They are always sick around the holidays so it was nice that it is all done and they don't have to worry about it anymore. They can stay home and stay healthy for the holidays. Got home from that and my daughter had got something that didn't work so had to take that bad. Then down to another town to pick my son up. He was staying at my xsil's. He went to spend the night and got home sick. So ended up being another long day. Today has been uneventful but didn't have time to stamp. So will start all again tomorrow. Thanks for all of you stopping bye and checking out my blog and for signing up for updates. I will be updating starting again tomorrow. I am sure things will have settled down by then.
Hope you all had a wonderful Thanksgiving and a safe one.
Angel Hugs,

Wednesday, November 21, 2007

Happy Thanksgiving Everyone


No time to stamp today getting ready for turkey day but wanted to wish you all a Happy Thanksgiving and if your traveling a safe one. See you all Friday!
Just for fun leave a comment on what you are thankful for this Thanksgiving. I will start.
I am thankful that I have my family near me and that I still have my parents with us to celebrate the holiday season.

Tuesday, November 20, 2007

Acetate Christmas

Have you tired this yet? I have seen so many of these acetate cards I had to try at least one. So off I went to buy some acetate but got projector sheets instead, which is close to the same thing.


Anyway this is what I did. Cut acetate 4 1/4 by 5 1/2. Fold in half, I did not score it as I was afraid it would crack it. So hand fold it. I stamped using SU Craft White ink, and had to emboss it so I embossed in white also for my snowflakes. Next I stamped my image on card stock and colored him in. Cut him out and mounted to Lovely Lilac then mounted this to the center as best I could on the front of the acetate. Then stamp a verse on card stock for the inside to cover up the tape from attaching your front piece. Layer like you did on the front. I also did the opposite side the same way. I didn't take a picture of the back of the card but I stamped with a sign with snowballs and it said "For Sale 5 cents" and this is my back message.


Now if you don't have any acetate or projector sheets (sold at Office Max) then try this on some vellum. It won't be as see through but I think it would also look nice. On the inside you will see my son's fingers he was holding it open for me.


Are you all ready for Thanksgiving? We are celebrating at my sisters house. All I need to do is bring deviled eggs. How easy is that.
Angel Hugs

Monday, November 19, 2007

Origami Box


Wow, this was so fun to do and so easy now that I found a place that has a tutorial on it. I will share that with you in a bit.


This box measures 4 x 4 and is 2 inches deep. How cool is that you can put something bigger in this box. I love how it turned out and love the step by step directions.


Only thing SU on this one is the white organdy ribbon and then I put some checked red ribbon on that with adhesive and attached to the box. This bow even went on nicely. It's even straight!


So now it is your turn to go to this blog and make your own. Believe me they are so fun and easy to do and will make your gift so much more special when they know you made the box yourself. This is my son holding the box, all you see is his little hands but he wanted me to have a picture of it before the ribbon so you could see how much the ribbon adds to the box. And also how thick the box is. You can see I used patterned paper for the top and red for the bottom.

And then again here it is finished with the bow and all. Hope you enjoy and make one for yourself or for you gift giving. I know I am going to be making more of these. Angels Hugs

Sunday, November 18, 2007

Peace Christmas Bulb


Another really easy ornament to make. This one is made from a 3 1/2 inch round coaster. I used Mod Podge to the coaster and placed my designer paper over that, let dry and trimmed around. Did the same on the other side. This stuff makes it stick real good. Next stamp your image or images on whisper white card stock and and mount to matching card stock, in this case it was real red. I made mine a little longer than needed so I could trim them once glued on. Glue one side at a time and turn and trim from the other side so you get it even. Do the other side the same, trying to match up on the edges.

Then I punch out a tab punch and folded in half, used my crop-a-dile and punched holes for eyelets for the bulb holder. I did on all sides (4) total. Then set my eyelets and then did another hole in the center top and set that eyelet, glued on top of my ornament and then put fishing line through to hang with. That's it, it is that simple. And they turn out so cute! Next one I think I will run the tab punch through the crimper instead of doing the eyelets, think it will make it look more real.
Hope you enjoyed today's ornament.
Angel Hugs

Foiled Embossed Wrapping Paper


Look how cool this turns out! I love it and it is so simple. I bought some foiled looking wrapping paper at Walmart today. I got 3 colors now wish I would of gotten more. Think I might send hubby back for Red, silver if they have some ( didn't on the silver when I was there today). Anyway I got this teal color shown here but it don't scan that color. I got some gold which is going to be really pretty too and a darker blue.


Now these are thin wrapping paper but it works great. I got this hint from someone on one of my groups, so of course just had to try it. I really hope you do to and are as pleased with the results as I am.

So all you do is cut strips of wrapping paper and cut to size and with your cuttlebug embossing folder emboss them with what ever machine you have. I have a sizzix and it works great for doing this.


I have not been uploading to my blog because we had a few things happen here. First of all I got 3 of my fingers slammed in the car door by my youngest son by accident. I was fixing the molding around the door when he didn't see my hand and slammed to the door. Well like all 12 year old they don't do it lightly. Luckily I did not break any fingers but they sure swelled and hurt for a while. They are back to normal today. Then yesterday our dog decided to take a run when I opened the door. Now if you know Jack Russell Terriers they can move fast! We got in our cars and went after him only to find him chasing the police car. After about 6 blocks he pulls over and asks " Is this your dog!" No we are just chasing him cause it looked fun! Good grief how dumb. Anyway, he took off from him and down another two blocks before we caught him. In the mean time he broke a toenail way down and it was bleeding pretty good. Which of course cured our shopping trip for the day. His paw is really sore an he is limping around but it did stop bleeding and we didn't end up having to take him to the vet. We will if his toenail dies out then it will have to be removed or if it doesn't grow back in right. So now you know why I have been missing on my blog.


I will try and get an ornament posted yet tonight unless of course something else goes wrong. But, I just had to share this foil wrapping paper with you.

Thursday, November 15, 2007

Easy Six Pointed Star


Another ornament for you to make. I got the tutorial on them from the Paper Pleasing blog. She has done an excellent job on this video and it is so easy to follow. Check it out and make some of your own.


I did do mine a little differently and added a eyelet at one of the points for threading my cording through for hanging on the tree. I figured it would have less of a chance to tear this way. On this red one I used a white eyelet to match the white in the words. On the blue one I used a blueish colored eyelet to match in. Now remember when doing these that you can have them different sizes. Depends on the size of your paper you cut out and how you cut your angle. Mine both turned out different and I used the 6x6 piece on both of them. Just cut my angle different.


So for this you will need either an eyelet setter and punch or your crop-a-dile. I use the crop-a-dile as it is one of the best tools I own. My oldest son got it for me last year for a Birthday present and I just love it. I also use the red liner tape for taping mine together it really is strong and holds really well.


So what are you waiting for go get out that designer paper, crop-a-dile, cutter and get going and make some of your own to embellish your tree this year. I am thinking I will be hanging mine from the arches in my doorway instead of my tree.

Again thanks for stopping by. And I really hope these are giving you some ideas for your tree.

Angels Hugs

Wednesday, November 14, 2007

More Pine cone ornaments


I so love making these. Each one turns out so different and so pretty. They look awesome on a tree. I can't wait to get my tree up this year to display the ones I have made for myself and that my kids have made. Each of my kids also made at least 2 each and I have 3 kids. Each year when they are on their own they can put these on their own tree and remember the times we had making them together.


So with that said here is a few more and as promised the directions or the site I got the directions of for you to make your own.


Now the directions a great tutorial is on Amanda Sewell's blog, so check it out and make your own. Get your kids in on this one. Mine when we made these was 19, 16 and 11. And they did beautiful jobs on them. Your kids will to. Now if you make one for your Christmas gift for someone, please share with me. Just upload them to your own blog and link to my blog in the comments area. Or if you upload to SCS you can link that one here too. I would really love to see what all yours turns out like.

Hope you all had an enjoyable day. We had such strong winds here from late yesterday afternoon until just a bit ago and it is almost midnight here.

Thanks for stopping by. Check back tomorrow for another kind of ornament for you tree. Also made from designer paper and super easy to do.

Tuesday, November 13, 2007

Beautiful Pine cones


Just a quick one tonight as it is really late and I need to get to bed. But wanted to share some of the pine cones I have made and gave away already this year. Again most of these have went to friends on a yahoo group I am on for an ornament exchange. I will share directions for these tomorrow along with a few more I have made that have flowers on them.
These are so easy to make. The hardest part is the pushing in of the pins, it makes the fingers a little sore.
Thanks for stopping by.


Monday, November 12, 2007

More 3D Snowflakes


These are the same as yesterday only I changed a couple of things in them. I think I like it better this way. I punched a 1 inch image and then a 1 1/4 inch matching piece to layer on so it matches the snowflake. And then these are all in blue.


My best friend in the cities loves snowmen and also blue is her favorite color so one will be going to her and 1 will be going elsewhere and of course one will stay with me. I mean I have to keep one for myself right?


We had a beautiful day today in Central MN. It was in the mid 50's. I loved it today. Hope it stays this way for awhile but I am sure it won't.


Thanks for stopping by.