Sunday, December 2, 2007

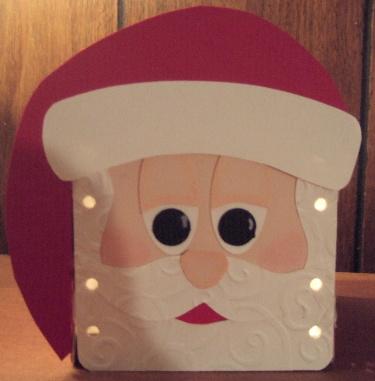
Santa Claus is coming to town.....


He turned out so darn cute. I had to share him. He still needs a pompom for his hat but otherwise he is finished. DH will be picking them up for me after work tomorrow.


Santa was made using the coasters again. I will maybe share a few more with you this week of the coaster boxes. I am really having fun with these and my son is getting back into doing them with me. He created a bear in a night cap and a bunny one.


So lets get with making Santa!


Supplies:


5 Coasters


White Card Stock


Flesh Card Stock


Black and Red Card Stock


Swirl Cuttlebug Folder if you want to add texture to your beard and mustache.


White Gel Pen


Ribbon, you cut this by wrapping around one of your coasters 1 1/2 times, this is used to lacing him together.


Pink chalk and q-tip for shading


PomPom


Large Oval Punch


1/2 circle Punch


Ok with your red cs, trace around 3 coasters. I only did 3 the bottom is just plain. The 4th one you do with flesh. Glue these to the coasters. Mark your holes, and punch them out for lacing later.


For his eyes you will punch 2 white and 2 flesh colored large ovals. Punch out 2 back circles with a 1/2 inch circle punch. With Gel Pen put little marks for eyes as seen in sample. This gives your Santa a personality. Place your black circles on the lower half of the white ovals. Next with your flesh ovals you will want to cut them in half a little less than 1/2. Now with both pieces together cut them with a curve upwards like in the sample for his eyelids. Chalk around the eyelids with pink chalk and add to your eyes pieces. See sample. With one of the flesh pieces that you cut off use that for the nose. Just form him to look like a nose. Again see sample. Chalk around your nose piece to so it gives him some dimension.


Run a 1/4 sheet of white card stock through with your swirl embossing folder. With pattern trace and cut out for beard and mustache. Then cut from a piece of red his mouth. I used the lower half of the beard and placed under and traced where the mouth should be. Glue on beard then the mouth piece (red) and then mustache. Place eyes so they are even and add nose. Your face is complete.


Next you will put your box together with your white ribbon.


For the hat trace that out on your red cs and his brim of his hat on white. I used the small flat adhesive dots to put him on my Santa. The little flap on the hat is glued to the piece beside along the side. It kind of covers the ribbon. Add your brim. Add your pompom to the bottom of his hat. Put your bottom in and your done.


Now wasn't that so easy. And he turns out so cute.


Pattern for the Santa can be found here. You need to enlarge it to fit your 4" coasters. When I did mine I just put it to fit my paper when printing out. See if yours has that option.

Saturday, December 1, 2007

Rudolph

I am not sure if I like how this one turned out. But, my daughter loves him so she will get him. Think I will try another one another day and will share that one another time.


Here is Rudolph and his supplies needed


5 Coasters ( I painted all of them a brownish color) Next time I will just use card stock


Red, and Craft Card stock for nose and antlers


Black for eyes of card stock


Black marker for mouth


White gel pen for making marks on eye and nose


Ribbon-- I cut the ribbon 1 1/2 times the length of the coaster and used that to lace them together.


Close to Cocoa ink pad for sponging the antlers


Oval Punch Large one for eyes

Use same directions for putting him together as you did for the snowman one. This is also one of dfaust coaster boxes. She has such cute ideas.

I will try and share another one tomorrow.

Here is the pattern for the antlers. Pattern should print out to correct size. I really hope if you all make these that you share them with me. Just post a comment to my blog with a link to your creations.

Thursday, November 29, 2007

Coaster Fun! Frosty

OMG! I seen these on SCS and just had to try him. I think he turned out rather well. I am proud of this little guy. So as promised here he is a day late but he needed to dry good for my glue to stick.


You will need 5 square coasters


White 1/4 inch or so ribbon


White, Black and Orange CS


Large Oval Punch


1/2 circle punch


1/4 inch punch or your crop a dile for the mouth pieces


Corner Rounder


gray chalk for eyes


rust chalk for nose


Snowflake Brad


Red Ribbon for hat


White Acrylic Paint and foam brush


Ok to get started paint your square coasters with white acrylic paint and let dry really well. You want to be able to stick the eyes, nose, mouth and hat to this. Punch your holes along the side evenly. I used the crop a dile for this.


Next punch out with your large oval punch 2 white eyes. Chalk around them as shown in picture. With a small piece of Orange cut an angle for his carrot nose and round the end so it looks more like a carrot. I just winged this have no pattern for his nose.


With the crop a dile punch out 9 circles with the largest punch for his mouth or you can use a 1/4 punch. Crop a dile works great for this part and goes quickly. Next with your 1/2 circle punch punch out his eyes and high light with a white gel pen or marker. Put his eyes on the white oval pieces. Next put all your pieces on one of the coasters that you painted for his face.


Next you will thread your ribbon on the sides of the coasters to put the box together. With some crystal effects glue the bottom on your snowman box.


Next cut out your hat with black card stock. I did the brim about 1 1/4 wide and just a touch over the edges of the front of the coaster piece. Top part of his had is 4" x 2 1/2" high. Piece these together and add your ribbon around the upper part of the brim of his hat. With the crop a dile or a small punch, punch a hole for your snowflake brad. Attach hat to your snowman coaster. And your have created a Frosty Coaster box, now wasn't that just so simple?


I hope you all like him as much as I do. The original one to make his is on SCS here is her snowman. So my thanks for thinking of him goes to dfaust on SCS. I love him and will be trying more of your coaster creations.


My youngest son Travis now wants me to make one for his teacher at school for Christmas. So I guess I will be making more of him and maybe add a hot choc. package and some small marshmallows in a baggy. Then a candy cane to stir it. And stuff inside of Frosty.

Angel Hugs

Tuesday, November 27, 2007

Such a busy day..........

Working on some coasters and they are not dry yet so I will share tomorrow. I have been working on them this evening. But so far they are not drying to well.
I didn't get to get anything else done as I was on the phone fighting with the title company on our home and land. They gave it away back to the guy that we bought it from so we are fighting to get that back and it took up all my time today plus! Was ordering gas today for heat for the house. And of course then you have all these phone calls in between. Kids homework and so on.
So look tomorrow for something fun to do.
Angel Hugs

Monday, November 26, 2007

Sparkly Frosty

Check out Frosty he is all in his glory! With all the metallic sparkles around him. I bought some foil Christmas wrap and run it through my sizzix with the snowflake embossing folder. And also did the same with some sparkly card stock I found at the dollar store one time. That is the silver background.


I stamped Frosty on Glossy card stock and colored him in with SU Markers. Cut him out and mounted him to the bluish foil. Trimmed the foil down so it is around a 1/4 inch all around him and mounted that to Real Red and trimmed. Did the same with the foil on the bottom I mounted it on Real Red card stock and trimmed 1/4 inch on each side. Mounted both pieces to the silver and onto Real Red card stock base. Then stamped Happy Holidays with black on Glossy card stock and mounted to Read Red and trimmed to 1/4 inch. Mounted this in the lower corner of the card.


It is a bit sparkly not sure what I think of it but this is the challenge card for the groups on Tuesday this week.

Here is the sketch for the challenge in case you would like to give it a shot. Again I got this sketch from Maria, I think her sketches are so fun to do.


The card itself will be going to my two cousins one is blind and can feel the embossing and the outlining of Frosty. And the other loves sparkles. They live together and my aunt is gone and my uncle is in the nursing home. So I hope they like their card.


Angel Hugs

Sunday, November 25, 2007

Life Little Pleasures

Sorry everyone I have been so caught up in life's little pleasures that I have neglected my blog. After Thanksgiving which was at my sisters house we got home late. Went to bed and was up at 3:30 am out the door by 4 and on our way to black Friday shopping. Wow, what a crowd but some great deals. I got a lot of Christmas shopping done. We hit several places, Walmart being first as my kids wanted several things to buy themselves also. So Walmart we separated and each stood by what we wanted and got them before they was all gone. This year they had it set up different here so it was so much easier to get to the things. Next we headed over to Fleet Farm as my son wanted a car jack set. Wow was that thing awesome and heavy. But, we ended up getting that, was surprised they had so many left. Then off to Target, dd wanted a game there and we also found some great movies we had been looking for and a price who could refuse. 3.88 each for some of them and 5.88 for the others. My kids of course loaded up on that one. They are also buying for friends so they got some good deals there. Off to Sears for a tool for my brother and then to McD. for breakfast and home. Took a long nap as I hadn't slept the night before.

Yesterday Dad was sick so I took Mom for her weekly hair appointment and then took her to do her Christmas shopping. They are always sick around the holidays so it was nice that it is all done and they don't have to worry about it anymore. They can stay home and stay healthy for the holidays. Got home from that and my daughter had got something that didn't work so had to take that bad. Then down to another town to pick my son up. He was staying at my xsil's. He went to spend the night and got home sick. So ended up being another long day. Today has been uneventful but didn't have time to stamp. So will start all again tomorrow. Thanks for all of you stopping bye and checking out my blog and for signing up for updates. I will be updating starting again tomorrow. I am sure things will have settled down by then.
Hope you all had a wonderful Thanksgiving and a safe one.
Angel Hugs,

Wednesday, November 21, 2007

Happy Thanksgiving Everyone


No time to stamp today getting ready for turkey day but wanted to wish you all a Happy Thanksgiving and if your traveling a safe one. See you all Friday!
Just for fun leave a comment on what you are thankful for this Thanksgiving. I will start.
I am thankful that I have my family near me and that I still have my parents with us to celebrate the holiday season.

Tuesday, November 20, 2007

Acetate Christmas

Have you tired this yet? I have seen so many of these acetate cards I had to try at least one. So off I went to buy some acetate but got projector sheets instead, which is close to the same thing.


Anyway this is what I did. Cut acetate 4 1/4 by 5 1/2. Fold in half, I did not score it as I was afraid it would crack it. So hand fold it. I stamped using SU Craft White ink, and had to emboss it so I embossed in white also for my snowflakes. Next I stamped my image on card stock and colored him in. Cut him out and mounted to Lovely Lilac then mounted this to the center as best I could on the front of the acetate. Then stamp a verse on card stock for the inside to cover up the tape from attaching your front piece. Layer like you did on the front. I also did the opposite side the same way. I didn't take a picture of the back of the card but I stamped with a sign with snowballs and it said "For Sale 5 cents" and this is my back message.


Now if you don't have any acetate or projector sheets (sold at Office Max) then try this on some vellum. It won't be as see through but I think it would also look nice. On the inside you will see my son's fingers he was holding it open for me.


Are you all ready for Thanksgiving? We are celebrating at my sisters house. All I need to do is bring deviled eggs. How easy is that.
Angel Hugs

Monday, November 19, 2007

Origami Box


Wow, this was so fun to do and so easy now that I found a place that has a tutorial on it. I will share that with you in a bit.


This box measures 4 x 4 and is 2 inches deep. How cool is that you can put something bigger in this box. I love how it turned out and love the step by step directions.


Only thing SU on this one is the white organdy ribbon and then I put some checked red ribbon on that with adhesive and attached to the box. This bow even went on nicely. It's even straight!


So now it is your turn to go to this blog and make your own. Believe me they are so fun and easy to do and will make your gift so much more special when they know you made the box yourself. This is my son holding the box, all you see is his little hands but he wanted me to have a picture of it before the ribbon so you could see how much the ribbon adds to the box. And also how thick the box is. You can see I used patterned paper for the top and red for the bottom.

And then again here it is finished with the bow and all. Hope you enjoy and make one for yourself or for you gift giving. I know I am going to be making more of these. Angels Hugs

Sunday, November 18, 2007

Peace Christmas Bulb


Another really easy ornament to make. This one is made from a 3 1/2 inch round coaster. I used Mod Podge to the coaster and placed my designer paper over that, let dry and trimmed around. Did the same on the other side. This stuff makes it stick real good. Next stamp your image or images on whisper white card stock and and mount to matching card stock, in this case it was real red. I made mine a little longer than needed so I could trim them once glued on. Glue one side at a time and turn and trim from the other side so you get it even. Do the other side the same, trying to match up on the edges.

Then I punch out a tab punch and folded in half, used my crop-a-dile and punched holes for eyelets for the bulb holder. I did on all sides (4) total. Then set my eyelets and then did another hole in the center top and set that eyelet, glued on top of my ornament and then put fishing line through to hang with. That's it, it is that simple. And they turn out so cute! Next one I think I will run the tab punch through the crimper instead of doing the eyelets, think it will make it look more real.
Hope you enjoyed today's ornament.
Angel Hugs